Hip hinging

This image demonstrates hinging at the hips while maintaining a neutral spinal position. We often flex forward, rounding our spine, leaving the hips behind. There’s nothing inherently wrong with this, it’s called a forward fold in yoga, but I don’t think it’s something we should be doing all the time. For some variety in your forward bending endeavors, try 3-point hip hinging for a change.

conable1 117.gif

3-point PVC hinging – Place a PVC pipe in line with your spine on your back so it makes contact with the back of your head, mid-back and sacrum (tailbone). With your neck long, hinge from your hips while keeping all three points of body contact with the pvc pipe (a broom handle will work too). Start with a small range of motion at first and build up as you get the hang of it. Let your knees soften naturally as a result of the hinge. Notice when you bend your knees a lot it loads the front of your thighs, and if you keep your legs straighter, the back of the thighs are more engaged. Let it be natural, keeping your hamstrings involved. As you get better at hinging from a basic standing position, try stepping side to side or doing lunges. Try one-legged hip hinges, extending one leg back, hinging from one hip, balancing on one leg. The purpose is to maintain full, neutral stature while moving, avoiding habitual scrunching, shortening or rounding yourself unnecessarily. Take a video and be pleasantly surprised if it looks different than it feels. Go slow, make corrections and as always pay attention to the process and nuances.

Next we’ll do some happy mapping of the knees.

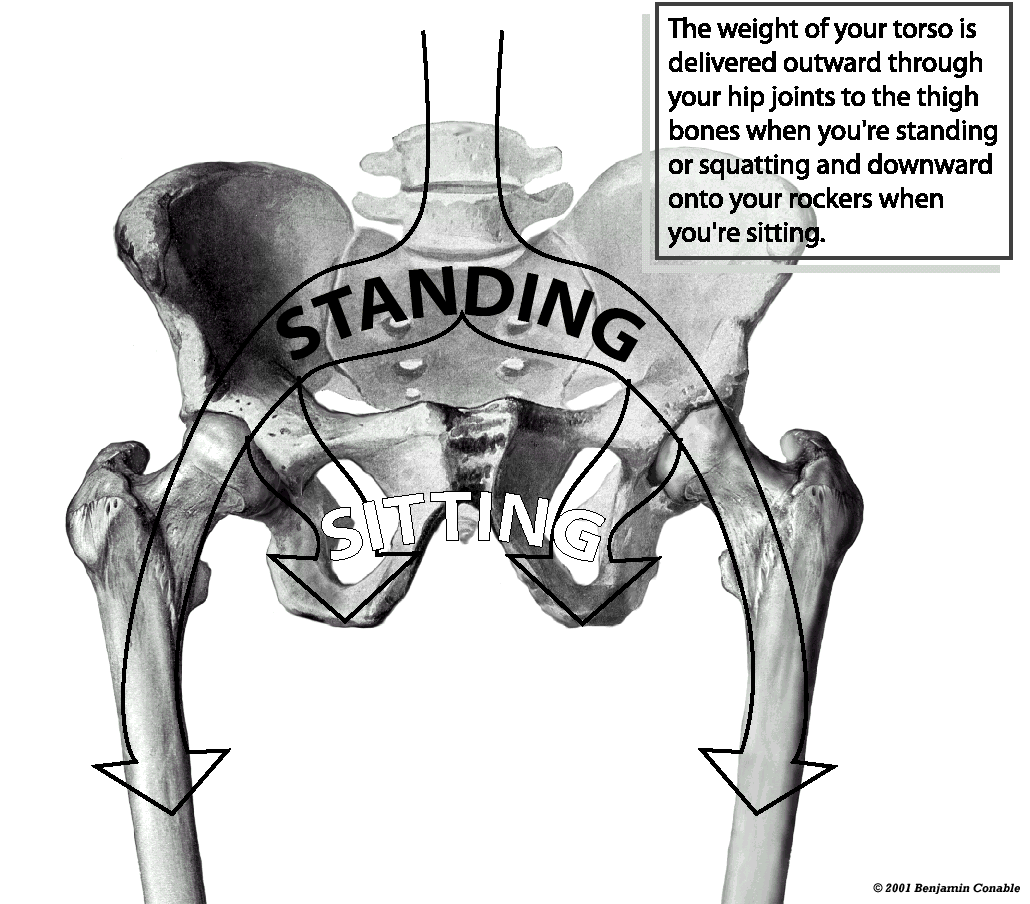
Weight bearing down the spine, pelvis and hips while sitting, standing and squatting

I show this image to clients who sit a lot. It shows how weight is delivered down through the hip joints when standing and squatting and down onto the rockers when sitting. Look at the hip joints. See where the weight delivery changes directions when sitting? The spine isn’t in one position when standing and another position when sitting. The only change that needs to occur is at the hip joints. We often slouch or round our spines when sitting and arch our backs when standing, this doesn’t need to be the case. We can be in a neutral spinal position more often when sitting and/or standing.

Think of the rockers (sit bones) like little feet. When you balance over them while sitting, the pelvis and spine are more likely to be in a mobile and balanced position. This keeps the surrounding muscles, ligaments and tendons from getting stiff and tired. Remember, there’s no substitute for standing up and moving around throughout the day and there’s no right way to sit. If you absolutely must sit for periods throughout the day, I suggest finding multiple ways to sit, moving around and through neutral more often.

conable1 104.gif

Study this image. Follow the arrows. Remind yourself often. This picture says more than I can say with words. Next we’ll build on this, by discussing hip hinging.

Watershed of lymphatic drainage

The image below is an example of how lymphatic fluid is circulated throughout the body. It’s a beautiful design. A teacher once likened it to how rain water flows from mountains to streams to rivers to the ocean. The lymphatic system is part of the immune system. It carries cellular waste and proteins away from tissues in the body and into the veins where the wastes can be excreted and eliminated and the proteins can be recycled for repeated use. The main purpose of this post is to give you a basic yet powerful technique to help you clear out your own lymphatic fluid when it gets backed up.

Take a few moments to follow the lines and arrows. See how the lines in the back of the pelvis lead to wells in the front of the body at the hip crease? Notice how the lines in the mid-upper back lead to the armpits? What else to you see? Daily manu…

Take a few moments to follow the lines and arrows. See how the lines in the back of the pelvis lead to wells in the front of the body at the hip crease? Notice how the lines in the mid-upper back lead to the armpits? What else to you see? Daily manual self-massage, arm circles and chest stretches can keep lymphatics flowing and keep you in the flow.

Look at how all the lines have arrows on them leading toward black dots. Think of these lines like rivers and the black dots as wells. The wells drain the lymphatic fluid from the surrounding areas and move it toward the bloodstream to be sorted and recycled. The major surface wells are behind the knees, in the groin, armpits and elbows. Notice the wells above the collarbones. These are the most important. This area is called the terminis. This is where all the fluid collected by the wells converge to be drained into the venous system. If clogging happens here, lymphatic fluid in entire body, including the head and neck, can back up, making you feel sluggish, heavy and tired all the way down to your toes. There’s good news though. It’s really easy to manually drain on your own. Simply placing your hands broadly over your collarbones and lightly to moderately massaging this area for a few minutes can encourage drainage. Basic arm circles and chest opening stretches can encourage the fluid to drain as well.

I show all my clients multiple ways to keep their lymphatic system flowing. This type of self care is particularly useful if you have chest or sinus congestion. It’s a simple way to keep yourself healthy and feeling at the top of your game.

Next we’ll look at how weight is distributed down the spine into the pelvis and hips!

Up and over

I want to let my neck be free, so I can let my head move up and over into balance, so I can let my torso lengthen and widen, so I can let my arms organize and move in rhythm, so I can let my knees go forward and away from each other, so I can let my ankles be free, so I can let my heels drop.

The statement above clearly and cleanly addresses all of the imbalances mentioned in the previous post. I’ve adapted it from multiple sources over the years and it continues to evolve. I appreciate the line “so I can let my head move up and over into balance” the most. Of all the ways we can think of lengthening our spine, this one, coupled with the image below, seems to have the biggest impact. I love it’s elegant simplicity.

The visual arrow moving from the base of the skull up and over the top of the head allows the neck to lengthen and places the head in balance, away from the spinal cord and over the weight bearing part of the spine, setting the rest of the body up t…

The visual arrow moving from the base of the skull up and over the top of the head allows the neck to lengthen and places the head in balance, away from the spinal cord and over the weight bearing part of the spine, setting the rest of the body up to take full advantage by lengthening, opening becoming spacious.

Direct your head up and over the weight bearing part of your spine. Feel your neck lengthen while noticing how your spine, pelvis and connection to the ground responds.

Next we’ll steer away from the head and neck and talk about how waste is removed from the body.

Common imbalances associated with chronic tensing of the neck.

Here’s a list of imbalances that commonly happen with chronic tensing of the neck while in a common sitting induced posture. What I like most about this list is that all of these imbalances derive at the head and neck region. A person could have one or many of these issues. Focusing on them locally where it hurts may not help until the head and neck are addressed and mapped back into balance.

  • The eyes accommodate the chronic backward drag of the head by shifting in the orbit, becoming chronically partially closed.

  • The jaw loses mobility and juts forward, opening.

  • The tongue bunches and the throat tightens.

  • The vertebrae of the neck are jammed together, putting pressure on nerves and blood vessels, creating a susceptibility to tension headaches.

  • Breathing is impaired, vital lung capacity is decreased, rib mobility decreases and the movement of breathing becomes disorganized.

  • The spine loses range as well as its ability to lengthen and sequence in movement.

  • Pressure is put on the internal organs.

  • The arm structure is distorted.

  • The shoulder blades are pulled together as the back narrows. There is also a caving-in of the chest, dragging the collarbones down and in.

  • The upper arm is torqued outward, rotation is compromised at the elbow, there is retraction across the wrist and the hands tense.

  • The lumbar area is shortened and forced forward, or back. The gluteals shorten, forcing the hip joints forward in space.

  • The pelvic floor is tightened uncomfortably upward.

  • The thighs torque outward, putting pressure on the knees and causing the lower leg muscles to tighten, hardening the area between the tibia and fibula.

  • The lower leg is pulled off the perpendicular at the arch, forcing weight onto the heel, or worse, onto the ball of the foot.

  • The foot torques the heel, pulling it to the inside as the front of the foot twists outward, often sufficiently so that the reflexes that give us a sense of a spring in the step are lost.

  • The toes lose mobility.

    Most of the bullets in this list are from the book, “How to learn the Alexander Technique” by Barbara Conable. She developed bodymapping and introduced it to me in 2001. I am forever grateful for the time I was able to learn from her.

Next we’ll revisit the head and neck with an image I’ve found very helpful over the years. I hope you will too.

Why bodymap? Remind me, I forgot.

Why is an accurate bodymap important? I added these images to support my point, but also to add a little color. When our bodymap is adequate and accurate, our movement is good. When our bodymap is off, our movement is a little off. In my practice, I’ve found this to be the difference between chronic tension and feeling ease in the body. Inaccurate bodymaps can slow the healing of injuries and are very often a contributor to pain and discomfort. Stretching and getting stronger will undoubtedly help you move and feel better, but adding the cognitive component of bodymapping can positively supercharge how you feel and move.

Movement that’s a little off can really add up on a day to day basis. You may not notice it at first, but it will compound and show up in your body and life at some point.

Movement that’s a little off can really add up on a day to day basis. You may not notice it at first, but it will compound and show up in your body and life at some point.

As you begin to correct your bodymap, you will enjoy finding new ways to move. How you balance and perceive your head in space will take on new meaning. You will experience your arms and their connection to the torso in a liberating way. Sitting, st…

As you begin to correct your bodymap, you will enjoy finding new ways to move. How you balance and perceive your head in space will take on new meaning. You will experience your arms and their connection to the torso in a liberating way. Sitting, standing and getting on and off the floor will feel like child’s play. Your hips, knees, ankles and feet will open up allowing you more freedom to explore the world around you.

I put together a list of imbalances that can happen when the bodymap of our head and neck is a little off. I’ll share that with you next.

Movement of the ribs

Movement of the ribs. I left out the word “cage” because it’s feels so limiting. Ribs move up and down and in and out when we let them. They are connected to the spine at joints in the back and are mostly flexible cartilage in the front. The image below shows the difference in position between ribs at inhale and ribs at exhale. You can also see a line for the the diaphragm. It’s more dome shaped on the inhale and ‘s’ curved on the exhale. Notice how the diaphragm moves very little at the midline and more as it moves away from the midline. The ribs are labeled 1-10 (ribs 11 and 12 are in the back and not shown here). Starting at rib 1, look at how much each rib can move. See how far rib 10 on inhale is away from rib 10 on exhale? The image you are looking at is smaller than life size, so take that into account as well.

Our ribs serve to protect our heart and lungs and assist breathing, but that doesn’t mean they can’t move in all kinds of ways.

Our ribs serve to protect our heart and lungs and assist breathing, but that doesn’t mean they can’t move in all kinds of ways.

Next we’ll refresh and remind ourselves why an accurate bodymap is important.

Diaphragm and pelvic floor excursion

This image gives you an idea of how much the diaphragm and pelvic floor move in relation to each other. The solid lines show how they rise together on the exhale. The striated lines show how they lower together on the inhale. Can you visualize a piston like motion moving up and down? The rhythm of the diaphragm and pelvic floor keeps the gut and viscera moving every moment of the day. They squeeze, compress and release the organs of their contents constantly. This movement halts stagnation and is crucial for elimination.

conable1 016.gif

In the next post we’ll look at how much the rib cage moves with each and every breath.

The subtle power of breath on the abdomen

Spinal lengthening and gathering aids breathing while keeping the pelvic floor and abdominal wall dynamic and resilient. The image on the left shows another example of how the respiratory diaphragm and pelvic floor work in rhythm with each other. As the respiratory diaphragm rises so does the pelvic floor. They both rise and lower together. This creates a continuous compression and decompression on the organs. You may not feel it on a regular basis, but this subtle multidimensional motion keeps everything in good working order all day long.

Notice how the top of the lungs reach their way up and beyond the collarbones. In most of the lungs continue to about an inch above them. This is valuable breathing real estate to keep in mind.

Notice how the top of the lungs reach their way up and beyond the collarbones. In most of the lungs continue to about an inch above them. This is valuable breathing real estate to keep in mind.

Look at how many layers of tissue surround the organs and viscera of the abdomen. it’s an absolutely beautiful design! In the front we have some abdominals and  internal and external obliques. At the bottom is the pelvic floor. In the back we have t…

Look at how many layers of tissue surround the organs and viscera of the abdomen. it’s an absolutely beautiful design! In the front we have some abdominals and internal and external obliques. At the bottom is the pelvic floor. In the back we have the quadratus lumborum, thoracolumbar fascia and erectors. Sneaking up the middle from the femur bone is the infamous, ever popular and powerful psoas group. On the right, you can see how the iliacus muscle elegantly lines the inner side of the ilium bone.

In the next post we’ll discuss a little bit more about how much the diaphragm and pelvic floor really move.

Spine lengthening and gathering

conable1 144.gif

A good way to keep ourselves mobile and our movement fluid is to recognize how breathing moves the spine, diaphragm and pelvic floor muscles. When we breath in, our spine gathers while our respiratory diaphragm and pelvic floor lowers. When we breath out, the spine lengthens as our respiratory diaphragm and pelvic floor rises. This is quite a lot of movement that occurs with each and every breath we take. Think of the breath like a pilot light in a furnace. It keeps the body primed and ready for action for when we want to turn the heat on.

Sensational exhale exercise: Sitting in a chair or standing, close your eyes and breath in and out. Visualize your spine lengthening and gathering. Sense your diaphragm and pelvic floor rising and lowering. Take a larger inhale and extend your exhale longer than you may normally exhale. As you extend the exhale, feel your abdominal muscles begin to contract. Keep exhaling and notice that you can feel your pelvic floor engaging and rising. After you’ve exhaled far enough, let go and let your body inhale naturally, following up with some assisted inhale at the end. Take a couple easy breaths and repeat the process a couple more times.

The sensational exhale exercise is a useful way to mobilize the bones, joints, muscles, fascia and organs of your torso. I use it with all my bodywork clients as it helps release stubborn tension patterns and encourages more movement with each and every breath. It can be very energizing as well. I begin most of my daily meditations with a sensational exhale or two. I notice it clears the “noise” in my nervous system that accumulates from everyday living and helps me settle in better.

We’ll continue exploring mechanisms of the breath in the next post.

Mapping the core of the neck

conable1+083.jpg

This image paints a beautiful picture. It’s what you would see if you took your head off and looked straight down. There’s a lot going on in there. Beginning on the left you’ll see a “c” shaped structure, that’s the insertion of the tongue. Did you know the tongue is the only group of muscles in the body that don’t move a bone or joint? It moves itself, food and helps to shape words when speaking or singing. It’s like a tentacle. In the middle of the tongue attachment you’ll see the windpipe and to the right of that is the esophagus, it’s the oval looking structure. Here’s where it gets fun. To the right of the esophagus is the first vertebrae of the spine called the Atlas. This is where the head optimally balances from. Notice its right in the middle, in the core of the neck. It’s a perfect place for the base of your skull to balance on.

To the right of the weight bearing part of the vertebrae is the spinal cord. It’s the trianglular/arrow shaped structure pointing toward the back of the neck. It’s the nervous system part of the vertebrae. Unfortunately, this is where a lot of people spend a big chunk of their time. Balancing our head over this space is a common contributor to neck tension, headaches and lack of freedom to look at the world around you. Notice all those shapes occupying the right side of the diagram? Those are all neck muscles. When the head is balanced over the weight bearing part of the vertebrae (the bony structure in the middle) the neck muscles are free to act as powerful head turning muscles. When the head sits any place else, they become head holding muscles and we begin asking these muscles to do two jobs, to hold our bowling ball like head and turn it when we want to look around. It’s a lot to ask. The neck muscles are able to do it for a while, but they will eventually get tired, causing pain and discomfort.

You now have a handful of different point of views to balance your head from. it doesn’t have to be perfect and doesn’t have to be all the time. Checking in with your bodymap a couple times of day can help take pressure off structures (nerves, blood vessels and muscles) that aren’t designed to handle constant loads. When your head is balanced more often, your neck is able to be free and your torso is able to lengthen and widen. This has a positive cascading effect down the hips, legs, ankles and feet and into the ground.

In the next post we will cover how the spine lengthens and gathers with our breath. See you there.

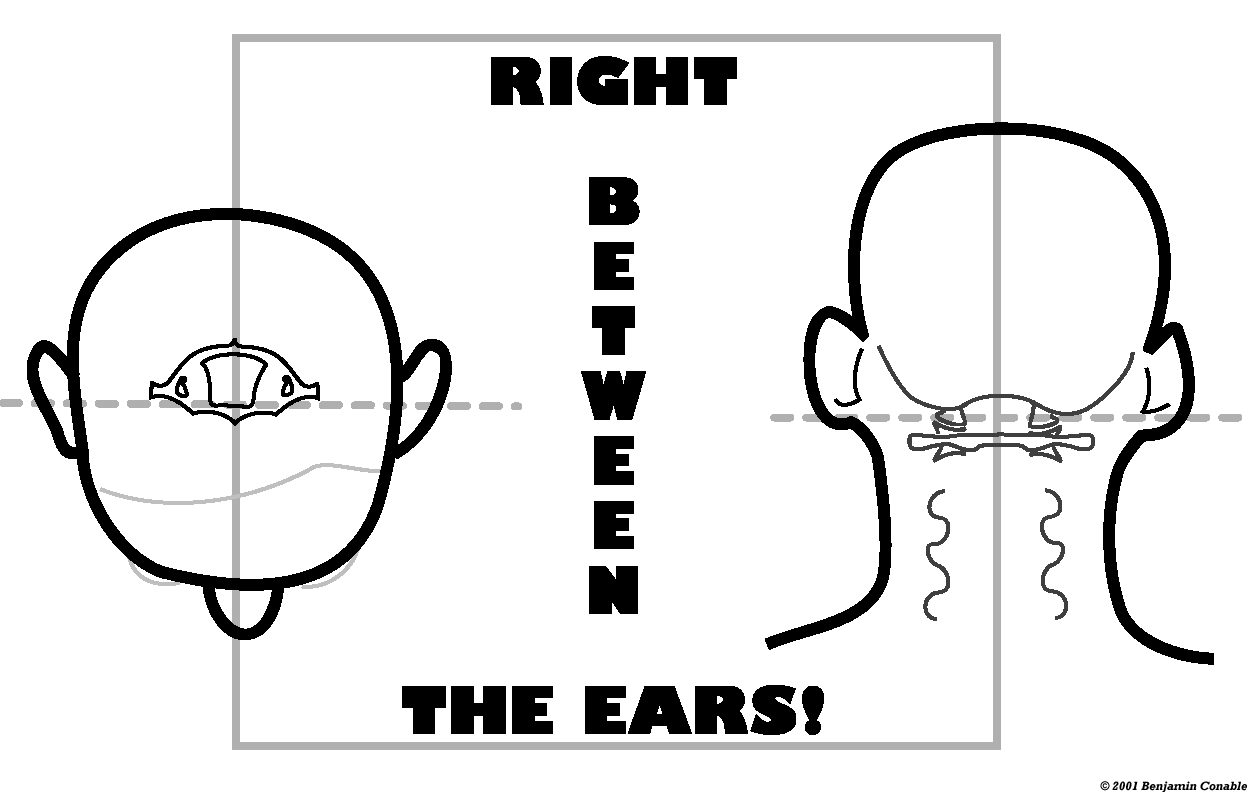
Freeing the head and neck from the top down and behind

The image below gives us a little more insight into balancing the head and freeing the neck. My hope is that it speaks for itself. The joint we are mapping is literally right between the ears. Is this helpful? In the next post we will use a more detailed image and description to help you triangulate and dial it in. It’s one of my favorites. Stay tuned.

conable1 008.gif

Balancing the head and freeing the neck

conable1 006.gif

We all have a bodymap. It governs the way we think about how we move regarding our structure, function and size. When our bodymap is accurate, movement is good. When our bodymap is inaccurate, movement is inefficient, tense and injury producing. Correcting mismappings is a great complement to my bodywork practice. It allows clients to change the way they move and the way they think about moving.

The image above shows where the head balances on the spine. In my experience people often move as though their head balances further back. This produces compression in the spine and unnecessary noise in the nervous system leading to neck tension, headaches and creates more effort in the body, from the head down to the toes.

Study this diagram to make some mental and physical corrections. Can you locate this joint with your fingertips? Here’s a hint, it’s behind your jaw and below your ears (right between the ears). Be inquisitive and search around a bit. Most people don’t find it right away. Be diligent. Use your sense of touch and movement to locate this crucial joint. A mirror may be useful.

As you locate and learn to refine how your head balances on your spine, your neck, chest and upper back muscles will respond by softening. Your head will move easier and the rest of your body will feel lighter.

If you aren’t sure if you have it mapped correctly, no sweat. It can take multiple point of views and time to make the appropriate corrections. In the next post, we’ll take a look at these same structures from the top down and behind.

Measure of Success

A Measure of Success. 

One of my measures of success with a client is whether or not they begin to move more on their own without me. Movement and training is one thing, but it’s when I see a client coming in early and getting on the rower, warming up without me, asking questions about movement or diet and following through that I start to think of myself as being successful with them.

What I want most for people is for them to develop a movement lifestyle. I love to see people become non-judgementally curious about themselves enough that they begin to move more on their own. They learn to improvise a little from the movement I’ve shown them. They experiment. They begin to see results and ask themselves what they can to do to get better. Whether it’s diet, sleep, breath, movement, recovery.  Whatever. You get what I am saying here? It takes patience. Patience on both of our parts.

I look for long term organic change. It’s not linear. I like to begin with movement and see what questions or motivations spring up from there. It can be simple like what should I do to recover after a workout or bodywork session? It can start anywhere and in my opinion, the simpler the better. Small changes over time can equal a sustainable movement lifestyle.

It’s probably the same as leading a horse to water or teaching a person to fish. But this is how I measure my own success as a manual therapist and movement coach. It’s my job to figure out how to work with a person in a way that will create curiosity, wonder, motivation. And I can be relentless in my pursuit of this. If a person isn’t responding in a way that I measure success then I figure out what the hell I can do differently to make that happen. Is it the way I talk or communicate? Is it the movement or exercise or technique? The progression?  As long as someone does the basic work, which is show up for scheduled appointments and be open, then I think we can be successful. It takes time though. If you show up and are ready to move, I will be there for you. Just know that a big meaningful goal of mine is to get you moving and exploring movement more on your own. I can show you all kinds of interesting things and you may progress brilliantly with me, but if I don’t get a sense that you are carrying it into your life, then I don’t feel like I am truly helping you and I don’t feel successful.